The First thing you need to do is to Download and install Artisteer.
Step#1: Creating a New Blogger Template:
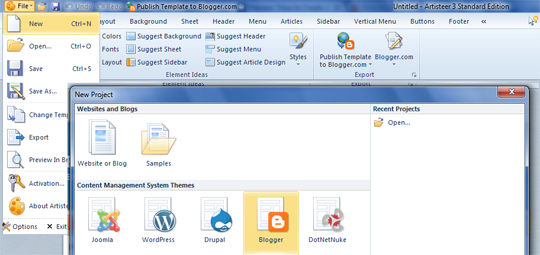
After opening Artisteer, the next thing is to create a new template document so go to File >> New. Now a new wizard will appear asking you to select a CMS (Content management system). It supports four most popular CMS system i.e. Blogger, Drupal, WordPress, DukeNetNuke and Jhoomla. Since, you are trying to create a blogger template, so you would select the “Blogger” icon. However, you can also work on other CMS themes. Once done proceed to the next step.
Step#2: Designing the Header:
Now you would be able to see a Simple blog theme, using the custom functions you would convert it into a professional theme. To start off you have to design your header area. On the tool bar there is an option known as “Header” just select it as shown in the screenshot below.

It will provide you numberless option through which you can change the width, height, background, position and lots of other things in your header. In fact, you can also use ready-to-use Flash and gradient background effects. Doesn’t that sound interesting? You can also use “Suggest Header” tool that assists your design and automatically applies a design that matches your color scheme and style.
Step#3: Designing a Perfect Sidebar:
Every blog has a sidebar that usually appears either on the left or right side of a website. On selecting “Sidebar” from the toolbar, it would provide you a few options. You can change the layout, add two sidebars, and can even customize it appearance.

If you wish to add two sidebars in your website select “Layout” from the sidebar menu which would provide you a couple of options such as one column, two columns and three columns. You can select it according to your needs.
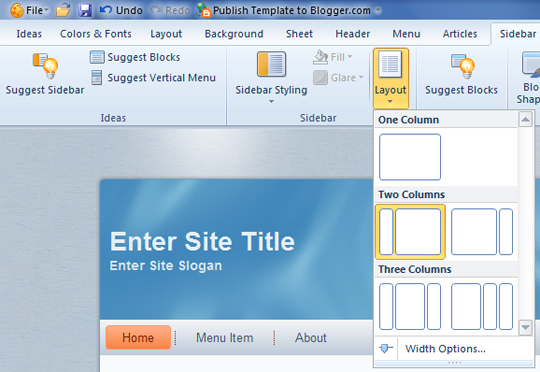
There are lots of other options like styling and coloring your sidebar. You can experiment all the functions and can create a new thing every time you play with them. However, if you have no idea how to style the sidebar, then you can try the “Suggest Sidebar” tool and this software would advise a few modifications.
Step#4: Designing an Impressive Post Page:
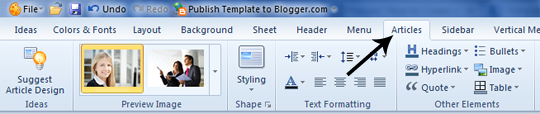
Post pages are the basic need of a website. Without having a proper post design your blogs remain empty or incomplete. To design impressive post pages select “Article” button present on the toolbar. It would take you to a list of options that can help you in creating an ideal post pages for your site. You can Change the Heading style, fonts, color, Blockquote and appearance of your post area.
All tools are there to help you, you can experiment each of them and can convert your theme into a masterpiece.
Step#4: Designing Other Core Elements of your Template:
Footer: You can also create a unique footer area for your site using the “Footer” button located on the tool bar. It doesn’t have lots of options for customization, but they are enough to create a decent footer.
Menu: By default, you get multi-drop down menus, so you do not code them from scratch. However, you can customize theme accordingly from the “Menu” button. It has a lot of options for customization.
Background: Using the background tool, you can either upload image backgrounds or can use the custom gradient color backgrounds. You can also add texture to your background using the same tool.
Layout: You can either use full-width layout or can select a certain width using the “Layout” option located at the toolbar. You can add border to your layout, texture, and other fascinating stuff to play.
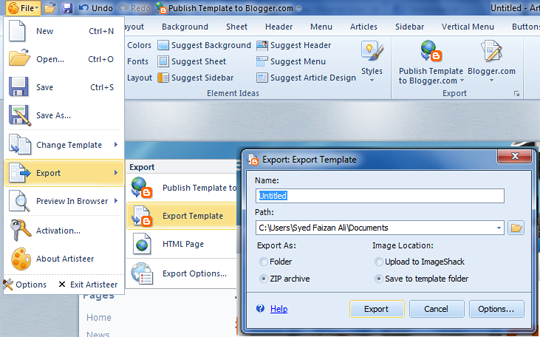
Step#5: Exporting Your Blogger Template:
Once your template is ready, it is time to export so that you can upload it on your blog. Go to File >> Export >> Export Template >> save the file. Remember: The file would be saved in .zip extension, so you need WinRAR to unzip it. The package would consist of two files i.e. the main blogger template in .xml format and a folder of pattern images.
Artisteer 4.1 for Windows
clicking here.
Now you would be able to see a Simple blog theme, using the custom functions you would convert it into a professional theme. To start off you have to design your header area. On the tool bar there is an option known as “Header” just select it as shown in the screenshot below.
It will provide you numberless option through which you can change the width, height, background, position and lots of other things in your header. In fact, you can also use ready-to-use Flash and gradient background effects. Doesn’t that sound interesting? You can also use “Suggest Header” tool that assists your design and automatically applies a design that matches your color scheme and style.
Step#3: Designing a Perfect Sidebar:
Every blog has a sidebar that usually appears either on the left or right side of a website. On selecting “Sidebar” from the toolbar, it would provide you a few options. You can change the layout, add two sidebars, and can even customize it appearance.
If you wish to add two sidebars in your website select “Layout” from the sidebar menu which would provide you a couple of options such as one column, two columns and three columns. You can select it according to your needs.
There are lots of other options like styling and coloring your sidebar. You can experiment all the functions and can create a new thing every time you play with them. However, if you have no idea how to style the sidebar, then you can try the “Suggest Sidebar” tool and this software would advise a few modifications.
Step#4: Designing an Impressive Post Page:
Post pages are the basic need of a website. Without having a proper post design your blogs remain empty or incomplete. To design impressive post pages select “Article” button present on the toolbar. It would take you to a list of options that can help you in creating an ideal post pages for your site. You can Change the Heading style, fonts, color, Blockquote and appearance of your post area.
All tools are there to help you, you can experiment each of them and can convert your theme into a masterpiece.
Step#4: Designing Other Core Elements of your Template:
Footer: You can also create a unique footer area for your site using the “Footer” button located on the tool bar. It doesn’t have lots of options for customization, but they are enough to create a decent footer.
Menu: By default, you get multi-drop down menus, so you do not code them from scratch. However, you can customize theme accordingly from the “Menu” button. It has a lot of options for customization.
Background: Using the background tool, you can either upload image backgrounds or can use the custom gradient color backgrounds. You can also add texture to your background using the same tool.
Layout: You can either use full-width layout or can select a certain width using the “Layout” option located at the toolbar. You can add border to your layout, texture, and other fascinating stuff to play.
Step#5: Exporting Your Blogger Template:
Once your template is ready, it is time to export so that you can upload it on your blog. Go to File >> Export >> Export Template >> save the file. Remember: The file would be saved in .zip extension, so you need WinRAR to unzip it. The package would consist of two files i.e. the main blogger template in .xml format and a folder of pattern images.
Artisteer 4.1 for Windows
clicking here.
No comments:
Post a Comment