search on web

How to crash a computer with just a url


This is a Trick that will hang your computer when you open the below URL.It uses a simple JavaScript trick which will open infinite number of mailto: boxes which will take all your RAM making your computer hang

The only way to recover from this trick is to kill the browser and mailto process using a task manager before it is too late.

So you can prank your facebook and email friends with this URL.

How to enable Show (Unhide) Hidden File and Folder option disabled after virus attack

Method 1

Here is how fix show hidden files and folders option:

· Click on Start button

· Click Run

· Type “regedit” without quotes in the box and press Enter.

Run Prompt


It should open “Registry Editor”, now do following steps:

Go to the following registry key:
“HKEY_LOCAL_MACHINE\SOFTWARE\Microsoft\Windows\CurrentVersion\Explorer\Advanced\Folder\Hidden\SHOWALL”

You will find tree type navigation on left side pane, click on the + sign on text mention on above path means first click on + sign of “HKEY_LOCAL_MACHINE” then on “SOFTWARE” then on “Microsoft” and so on until you find values provided in below screen shot.

Note: If you are a newbie then I would suggest you to back old entries before you make changes. To backup registry simply right click on “SHOWALL” name on left side then click “Export”, give a suitable name and save.


You only need to change or check two registry keys.

1. “CheckedValue” value should be 1.

2. “DefaultValue” value should be 2.

Don’t close “Registry Editor” now, go to folder option and try to unhide files and folders. It should work now and you can close registry editor

GPRS APN SETTINGS For All Network Providers In India

GPRS APN SETTINGS For All Network Providers In India

Internet is nowadays a basic need for all of us. Many times we change our network providers to them who provides the best Internet connectivity. In these situations you must have the settings for connecting to the internet via the Service Provider. So today I decided to provide the settings for Network Providers in India.

Here are the list of all the GPRS APN settings for Network Providers in India.


Aircel APN Settings

APN: aircelgprs | Access Number: *99***1#


Airtel APN Settings

APN: airtelgprs.com | Access Number: *99#


BSNL APN Settings

APN: bsnlnet | Access Number: *99#


Idea APN Settings

APN: internet | Access Number: *99#


LOOP APN Settings(Formerly BPL)

APN: mizone | Access Number:


MTNL (3G) APN Settings

PrePaid APN: pps3g

PostPaid APN: mtnl3g


Reliance APN Settings

APN: rcomnet | Access Number: *99#


Reliance Smart (GSM) APN Settings

APN: SMARTNET | Access Number: *99#


S Tel APN Settings

APN: gprs.stel.in | Access Number: *99#


TATA DOCOMO APN Settings

APN: TATA.DOCOMO.INTERNET | Access Number: *99#


Uninor APN Settings

APN: uninor | Access Number: *99#


Videocon APN Settings

APN: vinternet.com | Access Number: *99#


Vodafone APN Settings

APN: www | Access Number: *99#

Fix Windows is Not Genuine Message in Windows 7

We know how it feels when you are prompted by this “Windows is not Genuine” message every time you boot up your system. Though Windows is easily available today, not everyone wish to pay for this and thus uses the pirated copy of Windows OS.
Note: We do not encourage piracy and advise our viewers to use genuine software only.
Earlier we have also written about the “Windows Software Counterfeiting” problem and posted the solution using the RemoveWGA tool, which you can read here. “Windows is not genuine”, is a different problem than this and thus here is the solution below


Steps:
1. Solving this problem is very easy and can be done by using a simple tool calledRemoveWAT.
2. What you all have to do is, just download this tool from the link below (in case this link is not working you can search the net for this tool with the same name).
3. Extract the archive and double click the tool to run it.
4. You will see couple of options listed, just click on the “Remove WAT” button and it will start working on the problem automatically.
When the problem has been fixed, your system will be required to reboot. You will see that after the reboot your problem has been fixed and you will no longer see the “Windows is not genuine” watermark at the bottom right of your screen.
Now you can use the system as original and also set the wallpaper and themes which you were not able to, earlier.

download link 


Steps to Remove Trojan.Agent Virus


Recently I was asked by one our readers whose computer was infected by this Virus calledTrojan.Agent. This is a virus type that belongs to the Trojan virus family. The virus is mostly found in the svchost.exe file of the computer. It is a very potential virus and should be removed as soon as you detect it.
How to detect if your system has Trojan.Agent Virus?
• The weirdest thing that you will notice is that your Anti Virus would stop functioning. This virus has the ability to stop the AV from its proper functioning.
• Your system will get severely affected and would get extremely slow for no reasons.
• You might see some unexpected computer shutdowns or restarts.
• Then when if you scan your system with Mbam (highly advisable tool to have in the system), it will detect it and might delete it. But do note that Trojan.Agent virus might return back after the computer has been restarted.
• The virus can act as backdoor agent to many hackers to provide some confidential information.

How to remove Trojan.Agent Virus from the computer?
Removing Trojan.Agent virus from the system is not that difficult and requires sort of same steps that we most times perform to remove a malware.
1. First of all reboot the system to enter into the Safe Mode.
2. When in Safe Mode, run the Task Manager and terminate the process named asrandom.exe. This process is related to Trojan.Agent virus and termination is important as this will ensure that it is not running in the background.
3. Now we need to remove the virus from the system. This can be done manually and using a scanner. I would prefer both (please note that if you are unsure of the manual process, then do not proceed further as it might affect the system adversely.
4. So scan the system with Malwarebytes AntiMalware Mbam. If this finds the virus, quarantine it.
5. You also need to delete the following files (whichever you can find)
C:\windows\system32\Svchost.exe
C:\Windows\winsxs\amd64_microsoft-windows-s..s-service\controller_31bf3892wo9a07b1\services.exe
C:\Windows\Installer\{bbee3ba2-89af-930c-bb78-1fb4e17db3cc}
6. Now we need to delete the following registry keys too (again whichever you can find)
HKEY_LOCAL_MACHINE\SOFTWARE\Wow6432Node\Microsoft\Windows\ CurrentVersion\Run\Random.exe
HKCU\SOFTWARE\Microsoft\Windows\CurrentVersion\Run\Random.exe
HKEY_LOCAL_MACHINE\software\microsoft\windows\currentversion\ policies\explorer “EnableShellExecuteHooks”= 1 (0×1)
HKEY_LOCAL_MACHINE\SOFTWARE\Microsoft\Windows\CurrentVersion\policies\ Explorer\run\Random.exe
A system restart might have solved the problem for you and the Trojan.Agent virus should not be there

Fix the problem of USB Pen Drive not getting detected

usb

Some of our viewers wanted to know how they can solve the problem of USB Drives like Pen Drives not getting detected in the computer. This is a common problem nowadays and is a nuisance in case of need.

This problem can be of two types as listed below, so just figure it out and apply the correct fix:
Problem 1: Pen Drive does not get detected at all.
Problem 2: Pen Drive gets detected but doesn’t show up in the My Computer.
Let’s see the possible solutions to these problems:
Fix to Problem 1:
•    First of all check if the pen drive is working all fine by plugging it in some other PC. If it works well there then it means that the drive is not faulty.
•    Then run “devmgmt.msc” in cmd and click on the plus sign before “Universal Serial Bus Controllers” and update the drivers by uninstalling and reinstalling the drivers.
•    But if the Pen Drive comes up faulty then just get it replaced.
Fix to Problem 2:
This problem is caused when Windows fails to assign a new drive letter to the Portable Drive inserted for the first time.
•    Open Run, type “compmgmt.msc” and hit enter.
•    Now click “Disk Management” on the left side.
•    On the right side, right click on your USB Drive that appears in the disk management window and click change drive letter and paths.
•    Assign a new drive letter to the USB Drive which is not assigned to any other drive.
•    Now the Pen Drive will get displayed in My Computer.
This fix can also useful for people who just wish to change the drive letter of their USB Drive.

How to Create a Professional Blogger Template using Artisteer


The First thing you need to do is to Download and install Artisteer.

Step#1: Creating a New Blogger Template:

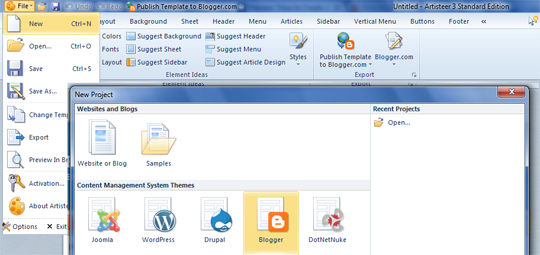
After opening Artisteer, the next thing is to create a new template document so go to File >> New. Now a new wizard will appear asking you to select a CMS (Content management system). It supports four most popular CMS system i.e. Blogger, Drupal, WordPress, DukeNetNuke and Jhoomla. Since, you are trying to create a blogger template, so you would select the “Blogger” icon. However, you can also work on other CMS themes. Once done proceed to the next step.

 
Step#2: Designing the Header:

Now you would be able to see a Simple blog theme, using the custom functions you would convert it into a professional theme. To start off you have to design your header area. On the tool bar there is an option known as “Header” just select it as shown in the screenshot below.


It will provide you numberless option through which you can change the width, height, background, position and lots of other things in your header. In fact, you can also use ready-to-use Flash and gradient background effects. Doesn’t that sound interesting? You can also use “Suggest Header” tool that assists your design and automatically applies a design that matches your color scheme and style.

Step#3: Designing a Perfect Sidebar:


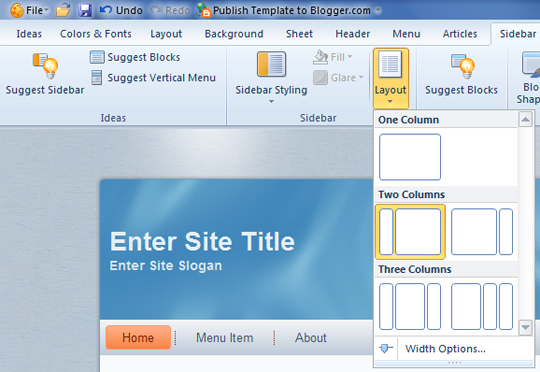
Every blog has a sidebar that usually appears either on the left or right side of a website. On selecting “Sidebar” from the toolbar, it would provide you a few options. You can change the layout, add two sidebars, and can even customize it appearance.


If you wish to add two sidebars in your website select “Layout” from the sidebar menu which would provide you a couple of options such as one column, two columns and three columns. You can select it according to your needs.


There are lots of other options like styling and coloring your sidebar. You can experiment all the functions and can create a new thing every time you play with them. However, if you have no idea how to style the sidebar, then you can try the “Suggest Sidebar” tool and this software would advise a few modifications.

Step#4: Designing an Impressive Post Page:

Post pages are the basic need of a website. Without having a proper post design your blogs remain empty or incomplete. To design impressive post pages select “Article” button present on the toolbar. It would take you to a list of options that can help you in creating an ideal post pages for your site. You can Change the Heading style, fonts, color, Blockquote and appearance of your post area.


All tools are there to help you, you can experiment each of them and can convert your theme into a masterpiece.

Step#4: Designing Other Core Elements of your Template:

Footer: You can also create a unique footer area for your site using the “Footer” button located on the tool bar. It doesn’t have lots of options for customization, but they are enough to create a decent footer.

Menu: By default, you get multi-drop down menus, so you do not code them from scratch. However, you can customize theme accordingly from the “Menu” button. It has a lot of options for customization.

Background: Using the background tool, you can either upload image backgrounds or can use the custom gradient color backgrounds. You can also add texture to your background using the same tool.

Layout: You can either use full-width layout or can select a certain width using the “Layout” option located at the toolbar. You can add border to your layout, texture, and other fascinating stuff to play.

Step#5: Exporting Your Blogger Template:

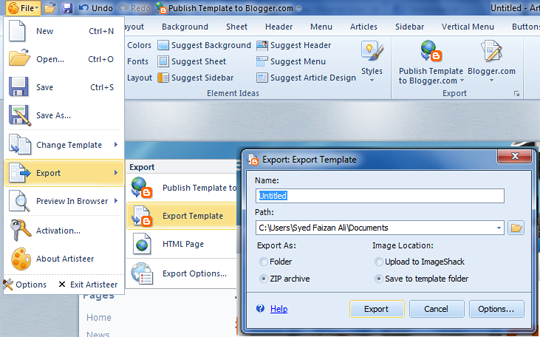
Once your template is ready, it is time to export so that you can upload it on your blog. Go to File >> Export >> Export Template >> save the file. Remember: The file would be saved in .zip extension, so you need WinRAR to unzip it. The package would consist of two files i.e. the main blogger template in .xml format and a folder of pattern images.


Artisteer 4.1 for Windows
clicking here.

c c+ + tutorial

Cmd commands

Cmd commands

Accessibility Controls :access.cpl

Add Hardware Wizard :hdwwiz.cpl

Add/Remove Programs :appwiz.cpl

Administrative Tools :control admintools

Automatic Updates :wuaucpl.cpl


Bluetooth Transfer Wizard :fsquirt

Calculator :calc

Certificate Manager :certmgr.msc

Character Map :charmap

Check Disk Utility :chkdsk

Clipboard Viewer :clipbrd

Command Prompt :cmd

Component Services :dcomcnfg

Computer Management :compmgmt.msc

timedate.cpl :ddeshare

Device Manager :devmgmt.msc

Direct X Control Panel (If Installed)* :directx.cpl

Direct X Troubleshooter :dxdiag

Disk Cleanup Utility :cleanmgr

Disk Defragment :dfrg.msc

Disk Management :diskmgmt.msc

Disk Partition Manager :diskpart

Display Properties :control desktop

Display Properties :desk.cpl

Display Properties (w/Appearance Tab Preselected)
:control color

Dr. Watson System Troubleshooting Utility
:drwtsn32

Driver Verifier Utility :verifier

Event Viewer :eventvwr.msc

File Signature Verification Tool :sigverif

Findfast :findfast.cpl

Folders Properties :control folders

Fonts :control fonts

Fonts Folder :fonts

Free Cell Card Game :freecell

Game Controllers :joy.cpl

Group Policy Editor (XP Prof) :gpedit.msc

Hearts Card Game :mshearts

Iexpress Wizard :iexpress

Indexing Service :ciadv.msc

Internet Properties :inetcpl.cpl

IP Configuration (Display Connection Configuration)
:ipconfig /all

IP Configuration (Display DNS Cache Contents)
:ipconfig /displaydns

IP Configuration (Delete DNS Cache Contents)
:ipconfig /flushdns

IP Configuration (Release All Connections)
:ipconfig /release

IP Configuration (Renew All Connections)
:ipconfig /renew

IP Configuration (Refreshes DHCP & Re-Registers DNS)
:ipconfig /registerdns

IP Configuration (Display DHCP Class ID)
:ipconfig /showclassid

IP Configuration (Modifies DHCP Class ID)
:ipconfig /setclassid

Java Control Panel (If Installed)
:jpicpl32.cpl

Java Control Panel (If Installed)
:javaws

Keyboard Properties :control keyboard

Local Security Settings :secpol.msc

Local Users and Groups :lusrmgr.msc

Logs You Out Of Windows :logoff

Microsoft Chat :winchat

Minesweeper Game :winmine

Mouse Properties :control mouse

Mouse Properties :main.cpl

Network Connections :control netconnections

Network Connections :ncpa.cpl

Network Setup Wizard :netsetup.cpl

Notepad :notepad

Nview Desktop Manager (If Installed) :nvtuicpl.cpl

Object Packager :packager

ODBC Data Source Administrator :odbccp32.cpl

On Screen Keyboard :osk

Opens AC3 Filter (If Installed) :ac3filter.cpl

Password Properties :password.cpl

Performance Monitor :perfmon.msc

Performance Monitor :perfmon

Phone and Modem Options :telephon.cpl

Power Configuration :powercfg.cpl

Printers and Faxes :control printers

Printers Folder :printers

Private Character Editor :eudcedit

Quicktime (If Installed) :QuickTime.cpl

Regional Settings :intl.cpl

Registry Editor :regedit

Registry Editor :regedit32

Remote Desktop :mstsc

Removable Storage :ntmsmgr.msc

Removable Storage Operator Requests :ntmsoprq.msc

Resultant Set of Policy (XP Prof) :rsop.msc

Scanners and Cameras :sticpl.cpl

Scheduled Tasks :control schedtasks

Security Center :wscui.cpl

Services :services.msc

Shared Folders :fsmgmt.msc

Shuts Down Windows :shutdown

Sounds and Audio :mmsys.cpl

Spider Solitare Card Game :spider

SQL Client Configuration :cliconfg

System Configuration Editor :sysedit

System Configuration Utility :msconfig

System File Checker Utility (Scan Immediately)
:sfc /scannow

System File Checker Utility (Scan Once At Next Boot)
:sfc /scanonce

System File Checker Utility (Scan On Every Boot)
:sfc /scanboot

System File Checker Utility (Return to Default Setting)
:sfc /revert

System File Checker Utility (Purge File Cache)
:sfc /purgecache

System File Checker Utility (Set Cache Size to size x)
:sfc /cachesize=x

System Properties
:sysdm.cpl

Task Manager :taskmgr

Telnet Client :telnet

User Account Management :nusrmgr.cpl

Utility Manager :utilman

Windows Firewall :firewall.cpl

Windows Magnifier :magnify

Windows Management Infrastructure :wmimgmt.msc

Windows System Security Tool :syskey

Windows Update Launches :wupdmgr

Windows XP Tour Wizard :tourstart

Wordpad :write    

Wireless to wired soft AP Creation using airbase-ng

Wireless to wired soft AP Creation using airbase-ng[TUT]

Airbase-ng is a very powerful tool in the aircrack-ng suite, I'll be using it today to show you how you can use this tool to:
  • create a full access point
  • bridge your software access point with your wired internet connection so that connected clients will have full internet access
  • set yourself up to orchestrate a man in the middle attack

    I won't go fully into detail on everything airbase-ng can do, but I urge you to do so yourself at the aircrack-ng website


For this tutorial I'll be using Backtrack 5.
You'll also need two network cards, I'll be using the alfa awus036h and my laptops on board nic plugged into my router.


Alright! Lets get started! First things first, we need to get our network cards ready for the attack.

First the Wired interface:

Run a cable from your ethernet port to your router so that eth0 has internet connection. It should automatically connect but you can always use Wicd network manager to verify.

Now your wireless interface:

Open up your terminal and bring your interface into monitor mode, I'll be using my alfa card for this which is on wlan1:
Code:
airmon-ng start wlan1

Now that our network cards are ready, its time to make our software access point. I like to pick something that people will want to connect to:

Code:
airbase-ng --essid FREE-WIFI -c 6 mon0


You should see that the access point has started and created a tap interface (at0). So note that we now have an open authentication access point created through software that anyone can connect to with the name "FREE-WIFI", however there is not internet access and clients cannot connect to internet, they'll receive a DHCP error.


To fix that, we're going to create a bridge between our tap interface and our laptops wired interface (at0 and eth0 respectively.) Do that by issuing the following commands:

Code:
brctl addbr FREE-WIFI-bridge
brctl addif FREE-WIFI-bridge eth0
brctl addif FREE-WIFI-bridge at0
ifconfig eth0 0.0.0.0 up
ifconfig at0 0.0.0.0 up

Now that everything is configured we'll assign an IP Address to our bridge to ping the gateway and test that everything works.

Code:
ifconfig FREE-WIFI-bridge 192.168.0.123 up
ping 192.168.0.1

Now if your ping requests are going through everything worked and you have a wireless to wired soft access point with full internet capability! All that's left now is to enable ipv4 forwarding in the kernel.

Code:
echo 1 > /proc/sys/net/ipv4/ip_forward


Once a client connects to you, you'll see it on the terminal still running airbase-ng. From here you can open up wireshark and start sniffing on the at0 interface. This is like a router sniffing its own packets, so we can see everything from here!


Now that everything is configured We're ready to get ready for an attack. Remember that not only are we now the man in the middle since all of the traffic is going through our machine, but we can also launch an attack as one machine on a lan to another. There's many things that we can do from here such as metasploit, session hijacking, and webpage redirection to name a few. I won't be going into depth on any of the actual attacks at this time because the possibilities are virtually endless, but there are many great tutorials around CHF, so see what you can come up with from here!

How to Unlock Idea Netsetter USB Modem 2G/3G

DRIVERS AND SOFTWARE Lenovo G480 (2184, 20149), G580 (2189, 20150), G780


Conexant Audio Driver for Microsoft Windows 7 (32-bit, 64-bit) - Lenovo G480 (2184, 20149), G580 (2189, 20150), G780
NameOperating SystemVersionReleasedAdd to download listDownload now
Conexant Audio Driver
0qau10ww.exe
104MB
Windows 7 32bit,
Windows 7 64bit
8.54.32.50(Smart Audio: 6.0.131.0)28 May 2012
Realtek Audio Driver for Microsoft Windows 7 (32-bit, 64-bit) - Lenovo G480 (2688, 20156), G580 (2689, 20157)
NameOperating SystemVersionReleasedAdd to download listDownload now
Realtek Audio Driver
0lau07ww.exe
187MB
Windows 7 32bit,
Windows 7 64bit
6.0.1.654915 Aug 2012
Bluetooth Driver (CyberTan, Liteon) for Microsoft Windows 7 (32-bit, 64-bit) - Lenovo G480 (2688, 20156), G580 (2689, 20157)
NameOperating SystemVersionReleasedAdd to download listDownload now
Bluetooth Driver (CyberTan, Liteon)
0lbl09ww.exe
515MB
Windows 7 32bit,
Windows 7 64bit
6.5.1.2602/7.4.0.103/7.4.0.130/6.5.1.260215 Aug 2012
Bluetooth Driver (CyberTan/Broadcom, Liteon/Broadcom, Liteon/Atheros) for Windows 7 (32-bit, 64-bit) - Lenovo G480 (2184, 20149), G580 (2189, 20150), G780
NameOperating SystemVersionReleasedAdd to download listDownload now
Bluetooth Driver (CyberTan/Broadcom, Liteon/Broadcom, Liteon/Atheros)
0qbl10ww.exe
320MB
Windows 7 32bit,
Windows 7 64bit
6.5.1.3200/7.4.0.13509 Apr 2013
TouchPad Driver (Synaptics, Elan) for Microsoft Windows 7 (32-bit, 64-bit) - Lenovo G480 (2688, 20156), G580 (2689, 20157)
NameOperating SystemVersionReleasedAdd to download listDownload now
TouchPad Driver (Synaptics, Elan)
0lto15ww.exe
267MB
Windows 7 32bit,
Windows 7 64bit
16.0.5.3/10.4.6.315 Aug 2012
Touchpad Driver for Microsoft Windows 7 (32-bit, 64-bit) - Lenovo G480 (2184, 20149), G580 (2189, 20150), G780
NameOperating SystemVersionReleasedAdd to download listDownload now
Touchpad Driver (Synaptics, ElanTECH)
0qto10ww.exe
272MB
Windows 7 32bit,
Windows 7 64bit
16.0.5.1/11.4.3.302 Sep 2012
Atheros LAN Driver for Microsoft Windows 7 (32-bit, 64-bit) - Lenovo G480 (2184, 20149), G580 (2189, 20150), G780
NameOperating SystemVersionReleasedAdd to download listDownload now
Atheros LAN Driver
0qla04ww.exe
5.33MB
Windows 7 32bit,
Windows 7 64bit
2.0.14.1528 May 2012
Wireless LAN Driver (Liteon/Atheros, CyberTan/Broadcom) for Windows 7 (32-bit, 64-bit) - Lenovo G480 (2184, 20149), G580 (2189, 20150), G780
NameOperating SystemVersionReleasedAdd to download listDownload now
Wireless LAN Driver (Liteon/Atheros, CyberTan/Broadcom)
0qwm05ww.exe
61.6MB
Windows 7 32bit,
Windows 7 64bit
9.2.0.502/5.100.82.11209 Apr 2013
Intel WiMax Driver for Microsoft Windows 7 (32-bit, 64-bit) - Lenovo G480 (2184, 20149), G580 (2189, 20150), G780
NameOperating SystemVersionReleasedAdd to download listDownload now
Intel WiMax Driver
0qwo03ww.exe
64.0MB
Windows 7 32bit,
Windows 7 64bit
7.0.1010.2631 Mar 2012
Wireless LAN Driver (CyberTan, Liteon) for Microsoft Windows 7 (32-bit, 64-bit) - Lenovo G480 (2688, 20156), G580 (2689, 20157)
NameOperating SystemVersionReleasedAdd to download listDownload now
Wireless LAN Driver (CyberTan, Liteon)
0lwo04ww.exe
79.3MB
Windows 7 32bit,
Windows 7 64bit
5.100.82.95/9.2.0.502/9.2.0.41915 Aug 2012
Intel Wireless LAN Driver for Microsoft Windows 7 (32-bit, 64-bit) - Lenovo G480 (2184, 20149), G580 (2189, 20150), G780
NameOperating SystemVersionReleasedAdd to download listDownload now
Intel Wireless LAN Driver
0qwl06ww.exe
229MB
Windows 7 32bit,
Windows 7 64bit
15.0.0.7531 Mar 2012
Intel Wireless LAN Driver for Microsoft Windows 7 (32-bit, 64-bit) - Lenovo G480 (2688, 20156), G580 (2689, 20157)
NameOperating SystemVersionReleasedAdd to download listDownload now
Intel Wireless LAN Driver
0lwl04ww.exe
229MB
Windows 7 32bit,
Windows 7 64bit
15.0.0.7529 Mar 2012
Intel Wimax Driver for Microsoft Windows 7 (32-bit, 64-bit) - Lenovo G480 (2688, 20156), G580 (2689, 20157)
NameOperating SystemVersionReleasedAdd to download listDownload now
Intel Wimax Driver 
0lwm03ww.exe
90.3MB
Windows 7 32bit,
Windows 7 64bit
7.0.1010.2629 Mar 2012
Atheros Wireless Lan Driver for Microsoft Windows 7 (32-bit, 64-bit) - Lenovo G480 (2688, 20156), G580 (2689, 20157)
NameOperating SystemVersionReleasedAdd to download listDownload now
Atheros Wireless Lan Driver
0lla04ww.exe
5.31MB
Windows 7 32bit,
Windows 7 64bit
2.0.9.929 Mar 2012
Lenovo Energy Management for Windows 7 (32-bit, 64-bit) - Notebook
NameOperating SystemVersionReleasedAdd to download listDownload now
Lenovo Energy Management
cagt26ww.exe
21.2MB
Windows 7 32bit,
Windows 7 64bit
7.0.3.424 Oct 2012

Add